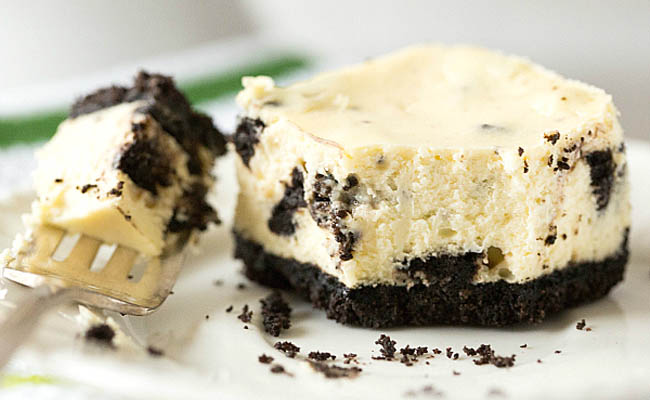
If you’re a fan of cheesecake and Oreos, get ready to indulge in a heavenly treat! This easy and delicious Oreo cheesecake recipe is a crowd-pleaser and perfect for any occasion. With a rich and creamy filling and a crunchy Oreo crust, this dessert will leave you wanting more. Whether you’re a seasoned baker or just starting your culinary journey, this recipe is foolproof and guaranteed to impress your family and friends. So let’s dive into the world of decadent Oreo cheesecake and learn how to create this mouthwatering dessert.
Ingredients
Before we get started with the recipe, let’s gather all the ingredients you’ll need for this delectable Oreo cheesecake:
- 2 cups crushed Oreo cookies
- 1/4 cup melted butter
- 3 (8 oz) packages cream cheese, softened
- 1 cup granulated sugar
- 1 tsp vanilla extract
- 3 large eggs
- 1 cup sour cream
- 12 Oreo cookies, roughly chopped
Step-by-Step Instructions
Creating the Oreo Crust
- Take the crushed Oreo cookies and combine them with melted butter in a bowl.
- Mix well until the crumbs are evenly coated with butter.
- Press the mixture firmly into the bottom of a greased 9-inch springform pan.
- Place the pan in the refrigerator to chill while you prepare the cheesecake filling.
Preparing the Cheesecake Filling
- In a large mixing bowl, beat the softened cream cheese until smooth and creamy.
- Add the granulated sugar and vanilla extract to the cream cheese and continue beating until well combined.
- Beat in the eggs, one at a time, ensuring each egg is fully incorporated before adding the next one.
- Add the sour cream to the mixture and beat until smooth and creamy.
- Gently fold in the chopped Oreo cookies, being careful not to overmix.
Assembling and Baking the Cheesecake
- Retrieve the springform pan with the Oreo crust from the refrigerator.
- Pour the cheesecake filling onto the crust, spreading it evenly with a spatula.
- Tap the pan lightly on the countertop to release any air bubbles.
- Preheat the oven to 325°F (163°C) and place the cheesecake on the center rack.
- Bake for approximately 50-55 minutes or until the edges are set and the center is slightly jiggly.
- Turn off the oven and leave the cheesecake inside with the door slightly ajar for about an hour to prevent cracking.
- Remove the cheesecake from the oven and let it cool to room temperature.
- Once cooled, refrigerate the cheesecake for at least 4 hours, preferably overnight, to set.
Serving and Enjoying
- Before serving, carefully remove the sides of the springform pan.
- Slice the Oreo cheesecake into desired portions using a sharp knife.
- Serve chilled and garnish with additional Oreo cookies or whipped cream, if desired.
- Each bite will be a heavenly combination of creamy cheesecake and crunchy Oreo goodness.
FAQs (Frequently Asked Questions)
Can I use a different type of cookie for the crust?
Yes, you can definitely experiment with different cookies for the crust. Graham crackers or chocolate sandwich cookies would make excellent alternatives.
How long does the cheesecake last in the refrigerator?
The Oreo cheesecake can be stored in the refrigerator for up to 5 days. Just make sure to cover it tightly with plastic wrap or place it in an airtight container to maintain freshness.
Can I freeze the cheesecake?
Yes, you can freeze the cheesecake for up to 2 months. Wrap it tightly in plastic wrap and place it in a freezer-safe container. Thaw it in the refrigerator overnight before serving.
Can I use reduced-fat cream cheese for a lighter version?
Yes, you can use reduced-fat cream cheese if you prefer a lighter version of the cheesecake. However, keep in mind that the texture and taste may vary slightly.
Can I add other toppings to the cheesecake?
Absolutely! Feel free to get creative with toppings. Fresh berries, chocolate ganache, or caramel sauce would complement the Oreo cheesecake beautifully.
How can I prevent cracks on the surface of the cheesecake?
To prevent cracks, make sure not to overmix the batter and avoid opening the oven door while baking. Allowing the cheesecake to cool gradually and refrigerating it before serving also helps prevent cracks.
Conclusion
Indulge in the perfect combination of smooth and creamy cheesecake filling with a delightful Oreo twist. This easy and delicious Oreo cheesecake recipe is sure to satisfy your dessert cravings and impress anyone lucky enough to taste it. With simple ingredients and straightforward steps, you’ll become the master of cheesecake in no time. So go ahead and treat yourself to a slice of heaven with this irresistible Oreo cheesecake recipe!
The world of cheesecakes is in a whir because of the arrival of the tempting and hauntingly delicious Oreo Cheesecakes. The soft creamy texture of the cream cheese contrasted by the crisp cookie crumbs will make you want to lick the spoon clean after you have finished eating the cake. The slight tanginess of the cream blends in with the sensuous rich taste of the Oreo cookies to make the Oreo cheesecakes one of the most baked cheesecakes by chefs and bakers all over the country, and planet. No wonder, cheesecakes in Singapore are in more demand than ever.
Cheesecakes companies in Singapore have been putting one delicious recipe after another to tease the taste buds of their varying clientele and to appease the finer senses of taste of food lovers and critiques. With the introduction of the Oreo Cheesecake to their list of offerings, they have just discovered a whole new way to win over some more hearts.
Oreo Cheesecakes is not a long and winding recipe. There is nothing complicated about it and the one can as easily bake the scrumptious cheesecake from the comfort of their kitchen as they can in a professional bakery. Pay careful attention to the ingredients, make sure you have a mixer and that your oven is adjusted to the right temperature settings and you will be well set on your way to baking a delicious Oreo cheesecake.
What do you need to make an Oreo Cheesecake?
To bake a delicious cheesecake you need no more than 20 minutes to prepare the batter, about an hour to let the cake bake and an additional forty-five minutes to let the cake sit in a water bath. However keep in mind that you will need to rest this cake for a minimum of 5 hours. The longer you rest the cake the better it will turn out. You can let the cheesecake rest for as long as 14 hours before you slice into it.
Tools Needed:
- 9″ spring form pan for baking (Make sure you have greased the pan well, so that the cake does not stick to the sides and the bottom of the pan.)
- A baking tray to act as a water bath
Ingredients to be Used:
For the delicious crumbly crust:
- 2 packets or 24 Oreos
- 2 Tbsp melted butter
For the filling:
- 3 (8 oz) packages cream cheese (Before you start working with the cream cheese, remove it from the refrigerator and leave it on the kitchen top till it reaches room temperature.)
- ¾ cup sugar
- 1 cup sour cream
- 2 tsp vanilla
- ¼ tsp salt
- 4 large eggs
- 5 Oreos (Coarsely crumble these Oreos into large pieces so that you can taste them when you bite into the cheesecake.)
- Additional Oreos (These Oreos will be used for decorating the cake. So get creative and use as many Oreos as you want. If you want you can once again crumble the cookies and use the crumbs to dust the top of the cheesecake.)
Procedures:
- First, preheat the oven to 350 F or 175 C.
- Prepare the crumb base for your cake. To do this, split open the Oreo cookies and scoop out the cream with a spoon. It is ok if the cookie breaks or crumbles while you are doing this. Once you are done with all twenty four cookies, toss the cookies without the cream into a mixer to get fine crumbs. Throw in the cookie crumbs with the melted butter and pat them down on the base of the 9″ spring form pan to form a one inch thick layer.
- Next, toss the cream cheese and sugar together in an electric mixer and beat them together for about a minute or till you feel they have combined well.
- Now add the sour cream and vanilla with a pinch of salt and mix it well
- Turn the mixer to a lower speed and gently break the eggs into the mixture. Make sure you are breaking one egg at a time. Be careful that you do not over beat this mixture. Excessive beating might cause your cheesecake to crack while baking.
- Turn off the mixer and with a spatula gently fold the large coarse pieces of Oreos into this mixture.
- Pour the mixture over the cookie crumble base and let it bake in the oven for about an hour.
- When you remove the cake it will not be completely cooked. It will have a slightly wobbly center.
- Wrap some aluminum foil around the base of the spring form pan such that the sides of the pan are also covered with the foil.
- Rest the pan over the baking tray and pour a kettle of hot water in the baking tray. Let the pan sit in the hot water bath for about forty minutes. Keep checking the water to ensure it is hot. Add more hot water if necessary. Finishing your baking in the manner reduces the chances of your cheesecake cracking during baking.
- After forty minutes or whenever the cake is completely baked, slide a knife to free the sides of the cheesecake from the pan. Allow it cool for at least five hours.
You can additionally use more cream and sugar to decorate your cake and top it up with more Oreos to achieve a dynamic finish!


